Monthly Archives: July 2010

Tri-color Peppers Stuffed with Quinoa

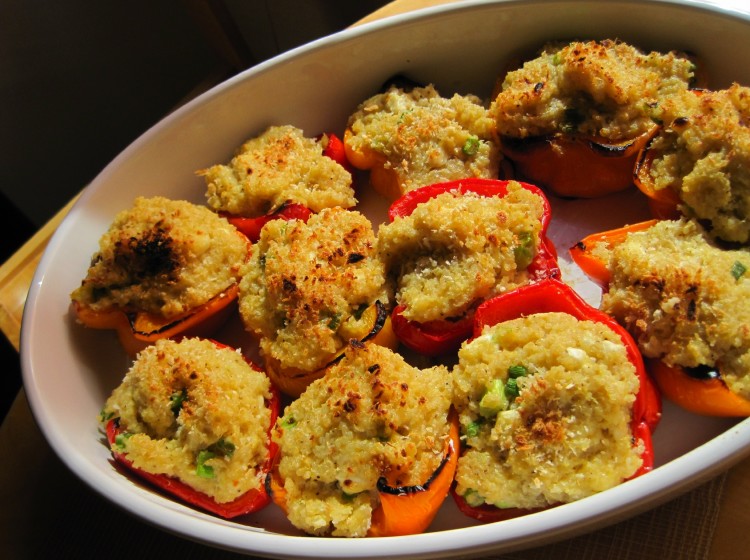
Peppers stuffed with quinoa stuffing in a white serving dish

Unless you’re six feet under, you’ll know quinoa is The New Big Thing – though this South American pseudograin is actually thousands of years old.

It’s fairly neutral and can stand in for white rice, for the most part, taking on the flavors of whatever it’s combined with.

Not only does quinoa have a goodly amount of protein, it contains essential amino acids, making its protein complete – which is quite something for a plant product.  Our bodies need a regular supply of essential amino acids, and usually get them from meat and dairy products or combinations of plant products.  If they are lacking, the body suffers from protein degradation, resulting in serious health problems.  Another little hitch is that the body cannot store EAAs.  If you eat meat and dairy on a daily basis, no problem.  If you don’t, you have to make sure you combine cereal grain and legumes (i.e., rice and beans) to get them into your system.  Having a food like quinoa available makes this much easier to accomplish.

There are also vitamins, minerals and fiber there, bumping quinoa to superfood status.

It looks kind of odd – like tiny grains of rice with tails.

Untreated, natural quinoa is coated with saponins, which not only taste bad, but are mildly toxic.  Most of the quinoa sold in the US has been pre-rinsed to rid it of of these saponins, but you should check to make sure that this is the case with whatever you buy.  I choose to subject any quinoa I purchase to a soak-and-rinse cycle, simply to avoid residual soapiness.

Now, what I don’t like about quinoa is that it loses its fluffy texture and gets somewhat mushy and sticky when you mix it with dressing, which is not the case with, say, cooked brown rice.  So, what I do is make the texture work for me by making stuffing.  The stuffing is then subjected to oven cooking, which dries it a bit.

The boys love this recipe, even though they’re not huge fans of plain quinoa.  Matthew most likely does not like it because he can’t stand couscous.  Steven, who knows?  When I mix in a bunch of other stuff, including feta – which is one of Matt’s faves – they may not realize that it’s quinoa in them thar sweet peppers with the crunchy crust.

Tricolor Peppers with Quinoa-Feta Stuffing
   Makes dinner for 3 or apps for 6

1 cup quinoa
2 cups water
1/2 teaspoon Kosher salt
1/8 cup walnut oil
1/8 cup olive oil
1/4 cup orange juice
1/8 cup fresh lemon juice
1/2 teaspoon onion powder
1/2 teaspoon white pepper
4 cloves roasted garlic, flesh squeezed out (you can press raw garlic and microwave – a few seconds at a time – to get faux roasted garlic)
1/4 cup toasted pine nuts
1 scallion, chopped
3/4 cup crumbled feta cheese
Sea salt (if needed)
3 large bell peppers (1 red, 1 orange, 1 yellow), cleaned, deveined and halved
3 tablespoons olive oil
1/2 cup panko (coarse bread crumbs)
2 tablespoons olive oil (or more – for drizzling on peppers before they bake)

1).  Follow instructions on your package of quinoa, or do this:  Soak quinoa in 3 cups cold water for 30 minutes and then drain through cheesecloth or a fine-meshed sieve.  Run plenty more cold water over it to rinse it well.  Move to saucepan with the 2 cups of water and 1/2 teaspoon salt and bring to a boil.  Cover and cook for about 15 minutes.  Remove cover and allow to sit for 5 minutes.  Grains should be translucent and the germ (tail) on each grain should have separated.  Move to a bowl and fluff with a fork.  Allow to cool about 30 minutes.
2).  While quinoa is cooling, whisk together oils, citrus juices, onion powder, white pepper and garlic.
3).  Fold dressing into quinoa.
4).  Rinse your chopped scallions (this will make them milder) and dry well.
5).  Fold scallions, pine nuts and feta into dressed quinoa.
6).  Check seasoning and add a little sea salt, if needed.
7).  Pour the 3 tablespoons of olive oil into a sheet pan and brush to distribute.
8).  Stuff each pepper half, distributing stuffing evenly.
9).  Brush a little of the oil from the bottom of the pan on the outside of the peppers (not the topping).
10).  Make sure peppers are evenly distributed on pan, and sprinkle each with panko.
11).  Drizzle a little olive oil on each pepper.
12).  Bake at 400 deg. F. until peppers have a little browning action.  Takes 30 – 40 minutes, but check to make sure they don’t burn!
13).  Broil for a few minutes if you want more browning on the top, but be careful!

Serve hot or cooled off on counter for an hour.  Very, very good the next day sliced on good bread with heirloom ‘maters and a little mayo.  Seriously.  This is why I make them.

Your Basic Fried Oyster Po’boy with Slaw

I admit to craving oysters every now and then.  I would have been happy in turn-of-the-century New York City, I think, where oysters were plentiful and every dive sold oyster stew.

I often see an oyster po’boy—or poor boy, if you want to get fancy—in my mind’s eye as I’m driving or doing laundry.  I never know when a strong desire for fried oysters will strike.

The bread in my po’boy fantasy is always an Acme sourdough roll.  The oysters are always large, plump and juicy — and there are so many of them they are falling out of the sandwich.  The breading on these fried pillows of bliss is a little crunchy and has some spice, but not enough to mask that hint of metallic funkiness.  There are slices of the tomatoes I had as a child – huge, red, ripe Beefsteaks from roadside stands in New Jersey and Pennsylvania.  A little cabbage slaw barely dressed in a sweet-sour dressing peeks out, and there might even be a little remoulade, if I’m getting really unhinged.

As you can see, to me, a po’boy is made with fried oysters.  Period.  Even though this Louisiana sandwich is perfectly authentic made with other kinds of fried seafood, or even meat, I figure I can have those things any old time.  Fried oysters make it special.

Believe it or not, it’s the bread that defines a po’boy.  Apparently there is such a thing as Louisiana French bread – something like a baguette – with a flaky exterior and a soft interior.  Perhaps this is like banh mi  – a Vietnamese baguette.  I’ve never had a po’boy in its native habitat, so I don’t know, but I have some time yet.

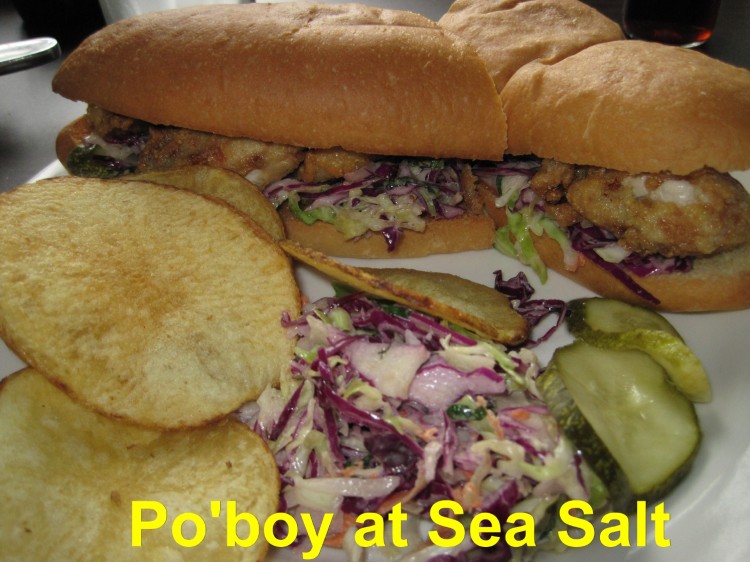
Matthew at Sea Salt restaurant in Berkeley

Matthew at Sea Salt restaurant in Berkeley

The long and short of this story involves Matthew, my son, and myself driving down San Pablo Avenue one day deciding to pop in to Sea Salt (2512 San Pablo Avenue, Berkeley) for a po’boy pour moi and fish and chips for his nibs.

Sea Salt is a solid seafood restaurant.  I like the fact that they preserve the authenticity of standards like fish and chips and clam chowder.  God knows there are enough places in Northern Cali where these things have been deconstructed and reinvented to death.

It ain’t cheap, being an upscale member of the K2 family of eating establishments, which includes Jimmy Beans, Fonda, T-Rex and LaLime’s.

That said, $14 is a small price to pay for your heart’s desire – served in a very nice space with great service, to boot.  My po’boy came on a quality roll with slaw and remoulade, and housed a respectable number of oysters.  Oh, man, the oysters were good.  Not only perfectly cooked, but fresh, given that they were shucking oysters in the kitchen while we were there eating.  The breading had texture and flavor, too.  Suffice it to say that the whole damned sandwich was slammin’.

I have to mention the hand-cut, house-made potato chips.  They were the thickest pototo chips I ever had in a restaurant, and not at all greasy.  Crunchy and salty, they were terrific.

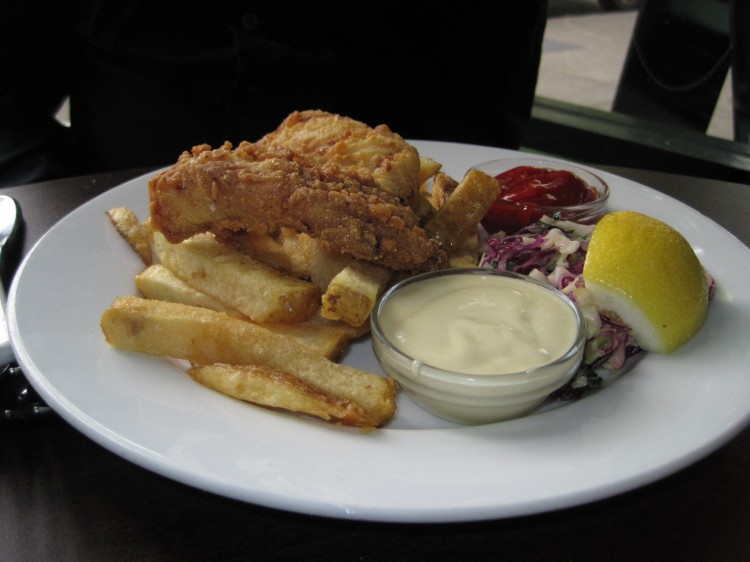
Matt’s $14 fish and chips plate was fine, if a bit skimpy in the fish department, but the quality was there.  The cod was fresh and nicely cooked.  Matt said he’d get the po’boy next time, though.

Fish and Chips at Sea Salt restaurant in Berkeley

Fish and Chips at Sea Salt restaurant in Berkeley

I think you should try your hand at a po’boy at home.  It can be a bit messsy, and it’s easy to overcook oysters, but the result will be worth it – even if you have to try a couple of times before you nail the oyster-frying process.

If you want to shuck your own oysters, great.  I do not.  I buy them from a fishmonger who will shuck them for me, or I’ll pick up a high quality, fresh, jarred oyster.  Look for sustainably-farmed, and ask your fish guy or gal which local oyster they recommend for po’boys.  Make sure you buy oysters at a reputable shop.  The last thing you want is food-borne illness from a shady oyster.

Renate's home-made po'boy

Po’boy at chez akitachow

Basic Po’boy
1 quart medium-sized fresh oysters (medium is nice and large – small is OK if this is all you can find)
3/4 cup flour
1 teaspoon Old Bay seasoning
1 teaspoon Kosher salt
1/2 teaspoon black pepper
1/2 teaspoon ground mustard
1/4 teaspoon cayenne pepper
1 – 1/2 cups panko (coarse bread crumbs)
1 teaspoon Kosher salt
3 eggs, scrambled with 2 tablespoons water
2 large, ripe, tomatoes, sliced or diced.  Use really good tomatoes or leave them out of the recipe!
Canola oil for frying
5 long rolls of some kind.  I like Acme sweet or sour rolls.  Use good rolls here!
If you have a large, cast-iron frying pan, this would be a good time to haul it out

1).  Whisk together flour, Old Bay, salt, black pepper, ground mustard and cayenne pepper in medium-sized bowl.  Set aside.
2).  Combine panko and salt in medium-sized bowl.  Set aside.
3).  Carefully – very carefully! – pour your oysters into a bowl.  No need to rinse them – just feel around gently for stray shell pieces.  I do this by catching each oyster as it transitions from jar to bowl.
4).  Arrange your breading station:  oysters, flour, egg mixture, panko mixture, receiving plate.
5).  Set up a large, heavy-guage, frying pan with about a 1/2 inch of Canola oil on your burner – but don’t turn on the flame yet.
6).  Set out a small sheet pan lined with paper towels to place fried oysters on, as well as long tongs.
7).  Set out your plates – place a split roll on each and have your slaw on stand-by.
8).  Bread oysters like so:  Add four oysters to your flour mix, allowing juices to drain through your fingers first.  Toss gently.  Move with dry hand into egg mixture, and coat evenly.  Move to panko, toss gently to coat, and move with dry hand to plate.  It’s hard to do the ‘wet hand, dry hand’ thing here, but see if you can keep one hand dry to move coated oysters around.
9).  When you are all ready, turn on a medium flame under your frying pan and let the oil get hot.  Toss in a couple crumbs of panko to see if there’s a sizzle.
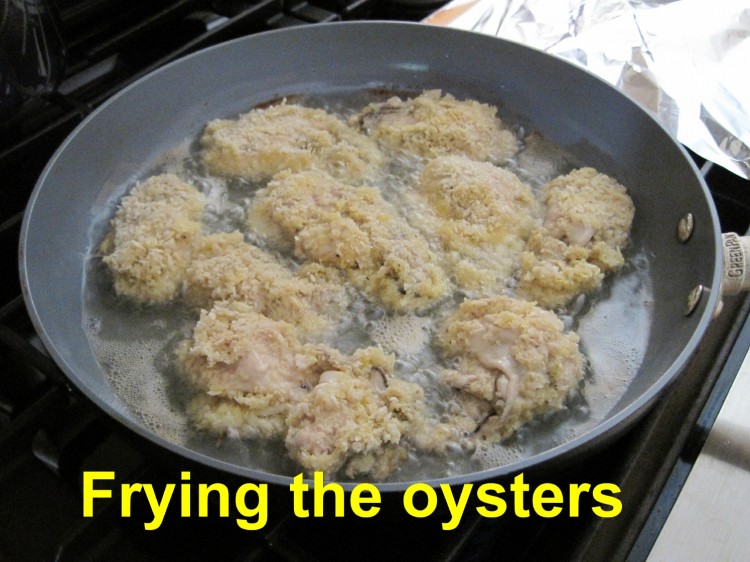
10). Gently add oysters (carefully, by hand, because they will be floppy) so you do not crowd them and thus wind up bringing the temperature of the oil down.  You want them to sizzle but not burn.
11).  Once they have browned a bit, turn them over gently with the tongs and let them quickly brown on the other side.
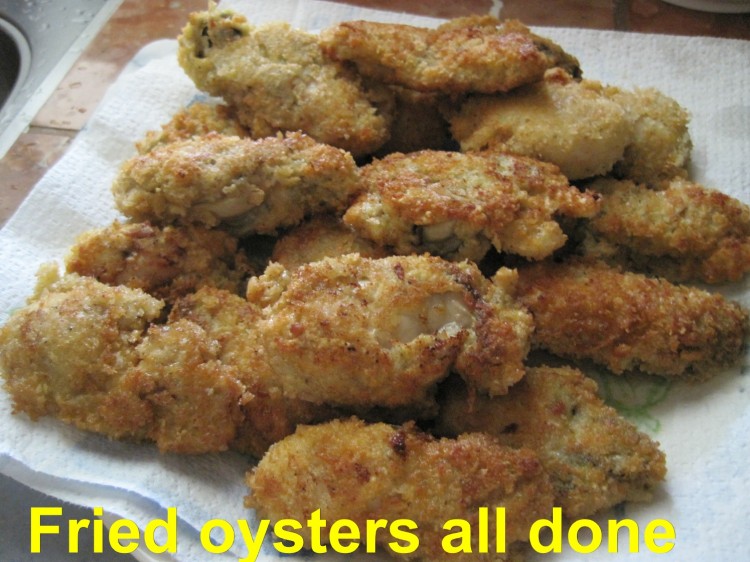
12).  Get them out of the pan and onto your sheet pan as soon as you’ve done this.  If you overcook them, they will shrink and become rubbery.  They do not need more than a few minutes over the heat.
13).  Bring oil back up to proper heat (add a little more oil if you need to) and repeat with remaining oysters.
14).  As soon as your last oyster hits the sheet pan, prep the rolls for the oysters.
15).  Arrange tomato slices in each roll and then heap a nice mound of slaw on top.
16).  Add 4 – 5 oysters on top and serve right away with lots of napkins!  I put the oysters on top of the wet stuff so they don’t get soggy.

Slaw for Po’boys
   Makes enough for about 5 large sandwiches
2 1/2 tablespoons white vinegar
2 tablespoons sugar
1/4 cup good mayonnaise (see my post on this)
1/2 teaspoon Dijon mustard
A little salt & pepper
1 pound shredded cabbage or cole slaw mix

1).  Whisk everything but the cabbage together in a bowl until the sugar is dissolved.
2).  Fold in cabbage well.
3).  Leave on counter for an hour, folding the mass together every so often.
4).  Place in fridge until ready to use.

If you want to serve a remoulade*, there are many recipes on the web, but you can’t go wrong mixing a little chili oil, white pepper and salt into some good mayo.

*A remoulade is often something like thousand island dressing, but it can also be akin to tartar sauce, depending upon the recipe.

frying oysters for po'boys  Plate of fried oysters to be used for po'boys

New Grocery Outlet in Pinole

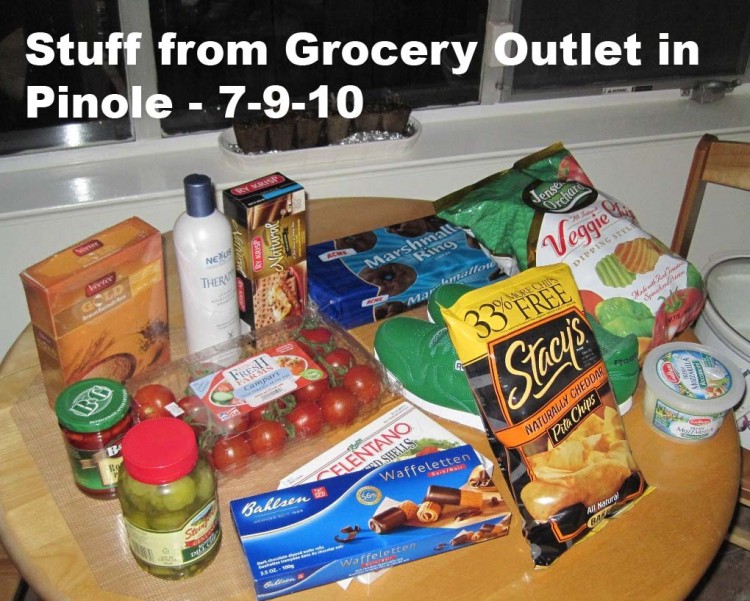
Items purchased from grocery outlet in pinole PA laid out on a table

A Grocery Outlet just opened in Pinole – 1460 Fitzgerald Drive.  I usually go to the one in Berkeley, since it’s only a couple miles from where I live, but I thought I’d check out the Pinole branch to see if they had anything special.  For example, the Berkeley location (2001 4th Street) has Vital Vittles bread, since VV is close to them, at 2810 San Pablo Avenue.  Note that there seems to be a problem with the Vital Vittles website right now.  Looks like they did not renew their domain on time.  Yikes!

Anyone who pooh-poohs this West Coast chain is out of their mind.

You never know what’ll show up at Grocery Outlet.  They carry stock from all over the country, including store brands from chains located in other regions, as well as imports.  Today I found Mallomar knock-offs from Acme (not only a brand popular with the Road Runner, but also a supermarket chain) for $1.99.  A Mallomar is a seasonally-produced marshmallow cookie with chocolate and graham cracker — very popular in New York City.  Unfortunately, real Nabisco Mallomars have been downsized to death, so I have no problem buying other brands.  A Mallomar back in 1970 was a thing of beauty, though.

I picked up two boxes of Bahlsen Waffle Rolls for 99 cents apiece.  I grew up with Bahlsen products.  The German half of my family lives in the same part of the country as the factory.  I love their stuff, but their website is annoying in all its amped-up glory.  When all you want to do is see some cookies, you’re told in German that you need Flash, and asked about taking a survey.  Just click “Nein.”

My husband will be happy to see Celetano stuffed shells in the freezer.  I don’t usually buy this kind of thing, but Celentano is a brand beloved by my husband’s family, and it conjures up the comfort of childhood for him, so what the heck.  He hasn’t had this since we left New York in 1995.  I don’t have the heart to tell him that Celentano was purchased by Rosina Food Products in a bankruptcy auction in 2000, though.  Most of the products we loved as kids have turned to crap over the years via death by a thousands cuts anyway, so you just have to enjoy the moment with this kind of thing and not worry about it too much.

They had Reebok’s at the Pinole store for $19.99.  We got Matt a pair of green lace-ups.

There were several Nexxux products, including Therappe shampoo and conditioner ($6.99 for 20 ounces).  This conditioner alone is worth the price of admission.

If you have the patience to weed through some oddball stuff and pay attention to detail, you cannot go wrong.  What may appear to be off-brands of things like Canadian bacon and salami in odd packaging may be irregular slices of brand name products – and sometimes the brands are high-end.  They often have pound packages of prosciutto like this for $3.99 in Berkeley.

I go when I want large jars of red cabbage or sauerkraut from Germany, which they sell for $1.99.  Once I found some 6-foot long Barilla pasta.

I’ve never purchased fresh meat or poultry, but I’ve gotten produce.  They cover every supermarket category – and then some.

If you haven’t been, go in and walk around.  You’ll find incredible bargains of name-brand merchandise, though some of the brands may be Canadian, particularly in the beauty care section.  This is fine with me, though, since lots of those products are not tested on animals and I’m always willing to try something new.

Grocery Outlet is a third generation family-owned business headquartered in Berkeley, by the way, so this may calm any residual concerns you have about visiting.

Seared Figs Stuffed with Chevre & Prosciutto

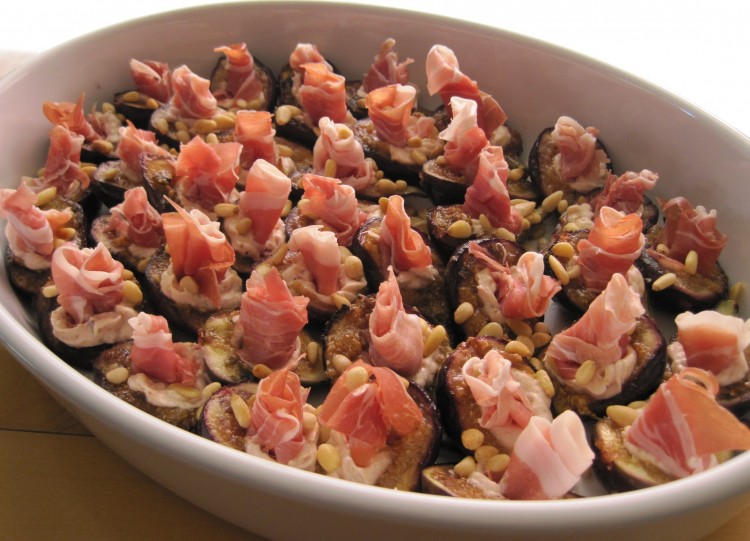
Figs stuffed with chevre, pine nuts and prosciutto

Of all the recipes I’ve developed, this is the one my family and friends request most often.

Each year we patiently wait for Mission figs to show up in the markets, which happens round about mid-June.  They’re as sweet as honey, with pink flesh and thin, black-purple skin.

These large, teardrop-shaped beauties are great to eat straight from the market, but you can create some wonderful dishes with them, too.  They work very well with cheese or pork – and this recipe has both.

This year I didn’t see them until last week – just in time for our 4th of July party.  If I didn’t serve these figs at that celebration there would have been hell to pay.

Each year the stuffed figs are proclaimed “the best ever,” which has more to do with absence making hearts grow fonder, but I’m happy to get the positive feedback, because, as everyone knows, cooks live to please others.  After we cook and present the goodies we make some effort to dig in, but we’re really watching everyone else eat to see what they think.

My family is very generous with praise, but I can tell when something is a major hit versus just very good.  I can see it in their faces and hear it in the noises they make.  When my son reaches over the table for a serving spoon with a certain flair, or my husband stretches out his vowels when discussing the merits of a particular side dish, I know.

The real prize is the person who never has much to say.  My stepfather was like that.  I could give that man a beef wellington and he’d be stone-faced.  However, when he did say something – and even then it was minimal – it meant something.  When he told me my crab cakes were “terrific” – in a tone he’d use only when talking about his car or the Yankees – I set that recipe in stone!  I’d like to think he’d feel the same about these figs.

Now, if Cali Mission figs were available in February, I’d make this dish for Valentine’s Day.  It’s so sensuous.  The fruit is sweet and earthy, the goat cheese ever-so-slightly funky, and the Prosciutto di Parma silky, salty perfection.

I hope you’ll give this a try now that figs are in the markets!

Figs Stuffed with Chevre, Pine Nuts & Prosciutto
Makes a whole lot, but why not?

2 pounds Mission figs, gently rinsed and dried.  Not too ripe, please!
Olive oil
1 teaspoon each ground thyme, ground marjoram, ground sage and sea salt – mixed together
1/2 cup plain chevre (fresh goat cheese)
1/3 cup pine nuts
6 – 8 ounces thinly sliced Prosciutto di Parma
A little sea salt
Pepper grinder
Would be helpful if you have:
Large, non-stick saute pan (or the most stick-resistant pan you have)
Melon baller (or teaspoon)
Pastry bag and rosette tip (or teaspoon)

1).  Place chevre in a small bowl and leave on kitchen counter along with your prosciutto, whose slices will be easier to separate if not ice cold.
2).  Toast pine nuts in saute pan set over medium heat for 3 – 5 minutes, keeping them moving, until they are slightly golden.  Set nuts aside.
3).  Cut figs in half lengthwise with a sharp knife.  Don’t cut off the stems – try to cut through them so you have half the stem with each half-fig.  They look better this way.
4).  Wipe saute pan with a little olive oil on a paper towel and sprinkle with some of the spice/salt mix.
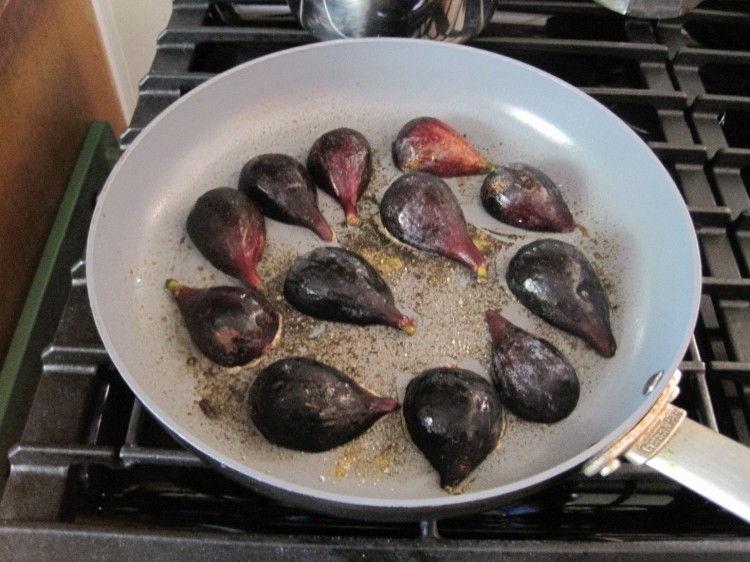
5).  Place pan over medium-high heat and add figs, cut side down, when pan is good and hot.  Add no more than 10 halves, and remove the first when the last hits the pan.  Work fast.  You more or less want the figs to “kiss” the pan – you don’t want to cook them!
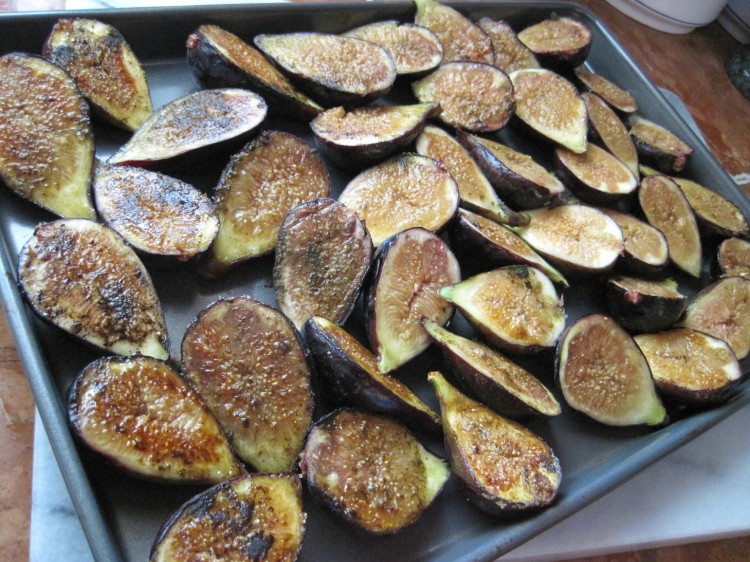
6).  Remove pan from flame, wipe with more olive oil, add spice mix, and do another batch of figs – repeating the whole deal until all are seared.
7).  Using the smaller end of a melon baller, or a teaspoon, scoop out a little flesh from the cut side of each fig half, being sure not to cut through the skin.  You need to create a small indentation, so don’t be too aggressive.  Place the scooped-out fig flesh into the bowl with the chevre as you work.
8).  Mix chevre and fig pulp, adding a crank or two of sea salt and freshly ground black pepper, until you have a well-combined filling.
9).  With a spoon or pastry bag and tip, add a little filling to the center of each half-fig.  The pastry bag set-up allows you to make it look better, but it’s just fine with a spoon, too.  Arrange the figs on a nice serving platter as you work.
10).  When you have all your figs filled, scatter half of the toasted pine nuts on top.
11).  Take prosciutto and cut your first slice into three ribbons – the long way, with a sharp knife.  Roll each third into a little rose, and place one in the center (filling) of each stuffed fig.  If you do it correctly, the prosciutto roses will stand up and add some vertical interest while allowing all of the ingredients to shine, visually.
12).  Serve right away, if possible, because they are very good just slightly warm.

Figs searing in pan with spices

Sheet pan 'seared figs

Figs with first phase of filling

Abstract 4th of July Glazed 7up Cake

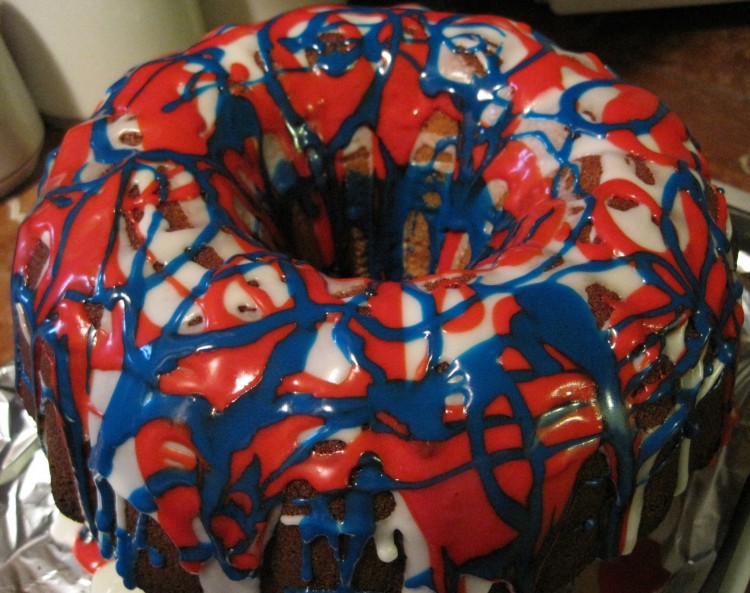
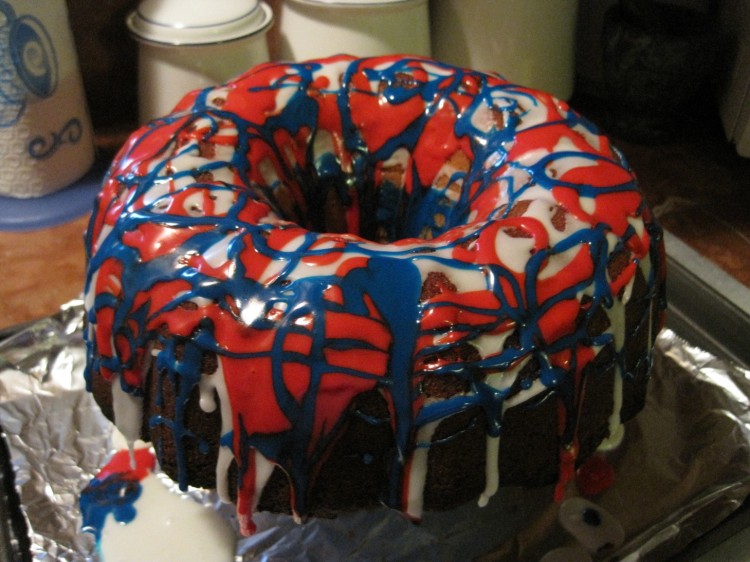
Abstract glaze for a 4th of July cake

My mother is going to see family in New York City and Germany this summer.  She’ll be gone for two months and is leaving on Tuesday, so I made a couple of special things as a sort of a bon voyage last night.  This is a reason to celebrate for all of us, if you catch my drift.

The meal turned out to be a total bomb.  It was hot in the kitchen, I was rushing and trying to do too much, and my leg was bothering me.  I have osteoarthritis in my right leg, which set in, they think, because of a minor injury I had years and years ago.  Standing for long periods wreaks havoc with that leg, even with a gel mat.  I was one miserable camper even before the oyster soup overcooked and broke.  Then I undercooked the brie in puff pastry, so it was gummy.  Amateur mistakes that were my own fault.  I stewed in my own juices as my family ate the oysters I fished out of the soup with the top layer of the baked brie, telling me all the while how good everything was.  You have to love kind people.

I sought to redeem that meal via the 7up cake I made for Matthew to take to a party today, which I gave an abstract glaze in red, white and blue.

Here’s how you can do it, too.

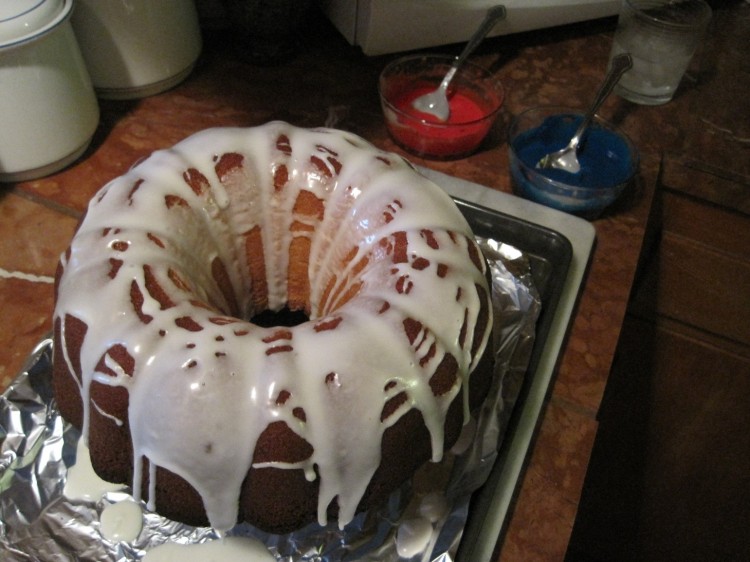
1).  First, make a pound cake in a bundt pan of some kind and let it cool completely.  Make this 7up cake, which is a huge favorite in my home, but ignore the glaze in the recipe.  It’s buttery and dense with a lemony zing, and uses 7up as a leavening agent.  When it’s cool, set out a sheet pan, line it with foil, place a small bowl on top, and then place the cake on the bowl, right side up, so it’s elevated.  Use a bowl whose diameter is smaller than that of the cake.  Check out the photos below.

2).  Assemble blue and red food coloring (you can buy concentrated natural food colorings on the web or in baking or specialty stores), confectioners sugar, lemon juice, one medium-sized bowl and two smaller bowls.  Use bowls that won’t be ruined by the food coloring.  You’ll also need three spoons.

3).  Place three cups of confectioners sugar in the larger of the three bowls.  Add a very small amount of lemon juice — no more than three tablespoons.  Mix in to check consistency.  Add more lemon juice in tiny increments, so you wind up with a very thick glaze that runs slowly.  You will need only a small amount of lemon juice!!!  Transfer 1/3 of the glaze to each of the smaller bowls.

4).  Add a few drops of blue food coloring to one of the smaller bowls of glaze and mix it in thoroughly.  Add more, if needed, until you get the color you want.  Repeat for red.

5).  Using a spoon and holding it above the cake, apply white glaze (the one you added no color to that’s remaining in the larger bowl), allowing it to cover the top well and run down the sides and middle. Check out the photo below for an idea of how things should look.  Allow cake to sit a few minutes.

6).  Apply red next, using quite a bit of glaze with each spoonful.  Drizzle on using a looping motion.  You want plenty of red, but allow lots of the white to show.  Make sure the red glaze runs down the sides and middle.  Allow cake to sit a few minutes.

7).  With blue, swirl all over cake in small ribbons.  You want this layer thin with lots of lines so it creates an abstract design.

8).  Let cake sit for a couple of hours.  Do not touch it!  Do not cover it!

9).  Tent foil over cake gently and let it sit all night so that the glaze hardens completely.  Do not touch cake with foil!  Do not move cake!  Leave the whole contraption as-is and cover it with foil!