Yearly Archives: 2010

Costco’s chocolate-covered caramel apple

Costco's new chocolate-covered caramel apple

Costco’s new chocolate-covered caramel apple

I like plain sweets and have a fondness for soft caramel, so when I saw this choco-covered Granny Smith caramel apple at Costco last week I almost swooned.

There is no way I was not going to buy this thing at least once, in the hope it would be everything Mrs. Prindable’s could be if they made their apple products with higher-quality coatings:  pleasantly sweet and bitter from the chocolate, soft and creamy from the caramel, and crunchy and tart from the green apple.  When this combination is done right it’s the perfect grown-up caramel apple.
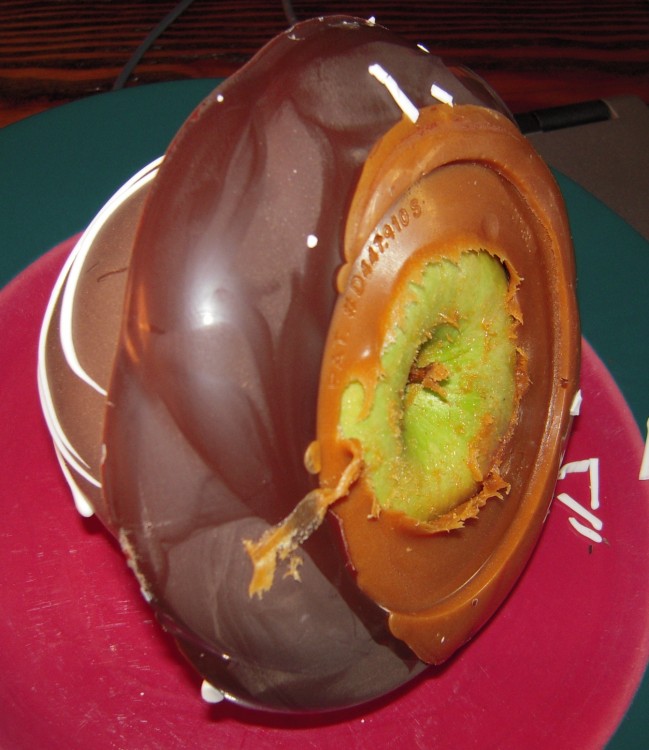
The bottom of Costco's chocolate-covered caramel apple

The bottom of Costco’s chocolate-covered caramel apple

This is a large enrobed apple presented in a domed container; mine weighed in at 14 ounces.  The chocolate and caramel pooled during production, providing a thick ring of goodness – as the photo above shows.   Upon further inspection I found that the caramel was, indeed, quite soft, putting any fears about fillings and crowns to rest.  It sliced easily while retaining integrity.
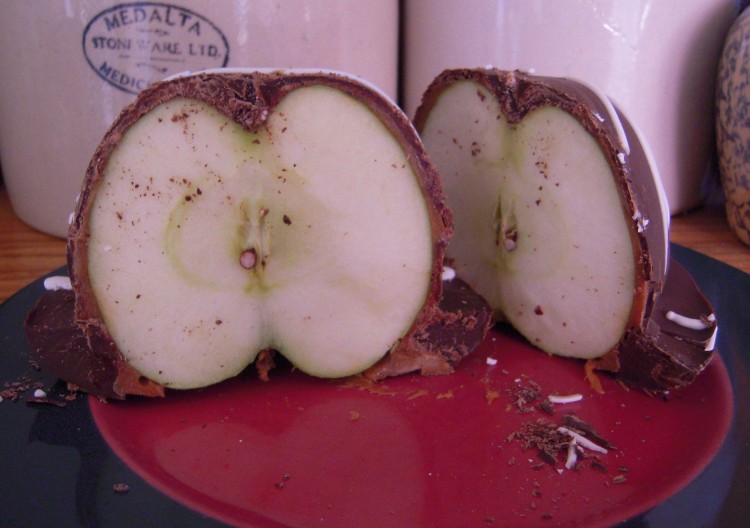
Costco's chocolate-covered caramel apple cut in half

Costco’s chocolate-covered caramel apple cut in half

In terms of flavor, texture and overall impact, this is a winner.  The apple was fresh, crisp and tart.  The chocolate of a decent quality and not overly sweet.  The caramel creamy.

While there was some caramel around the entire apple, I wished that layer was a bit thicker, but I have no real complaints.  This is a very, very good product and I will purchase it again when the craving strikes.

Well worth it at $5.99.

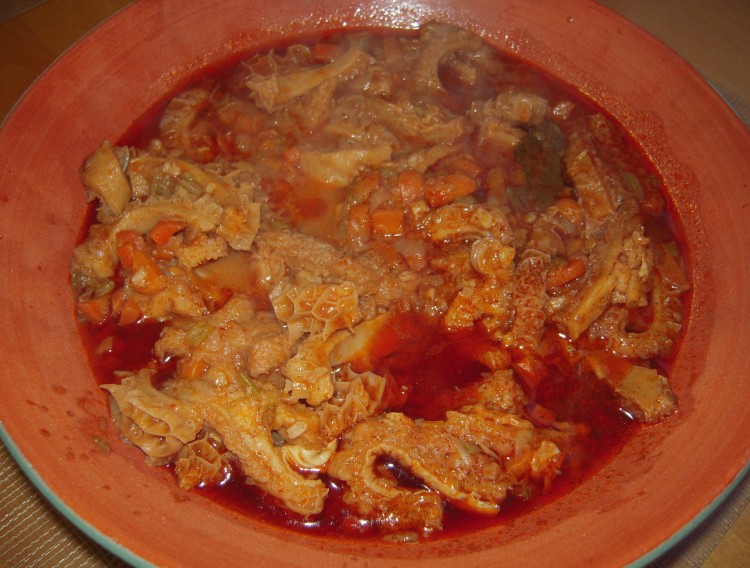
Your basic tripe stew

Tripe stew in the Polish tradition - red from the paprika!

Tripe stew in the Polish tradition – red from the paprika!

We love tripe.  My Mom is from Germany, and her family ate everything edible on an animal, and passed that principle down to me.

I often have tripe at dimsum, and it’s a real treat.  It’s usually served two ways.  Honeycomb tripe (from the second stomach structure of a cow) is stewed with turnips in sauce, rendering it soft and savory.  Book tripe, from the third stomach structure (I say this because cows technically don’t have four stomachs), is steamed with scallions and ginger and served with a light dipping sauce.  Try one or both when you go for dimsum just to see if you can deal with the texture, which is the issue for most Americans.

I make it at home once every few years.  It’s readily available at Asian markets, like 99 Ranch, and pretty easy to deal with, since most of the tripe sold nowadays has been thoroughly cleaned and blanched.

For the recipe that follows, use honeycomb tripe, which has little honeycomb indentations on one side.  Don’t use book tripe, which is the other one commonly sold.  Book (aka leaf) tripe has thin strips on one side, and does not work as well in a stew.

This is more or less a Polish recipe, but I’ve futzed with it over the years.

Serve with a soft starch, if you like, but I want textural contrast, so I eat it with a crispy baguette.

Renate’s Tripe Stew
     serves 6, if you have sides and/or plenty of bread

2 1/2 pounds honeycomb tripe
3 tablespoons Canola oil
1 rib celery, de-stringed/small dice
1 large carrot, small dice
1 yellow onion, finely chopped
4 cloves garlic, finely chopped
1/3 cup tomato paste
2 – 3 cups chicken stock
2 teaspoons sweet paprika
1 teaspoon ground marjoram
Salt & pepper

1).  Rinse tripe and scrub well with Kosher salt on both sides.  Rinse several times.  Cut into 1/2 inch strips that are 3 – 4 inches long.  Boil strips  for 40 mins.  Drain well and set aside.
2).  Saute celery, carrot, onion and garlic in oil in heavy gauge pot until soft and golden brown.  Do not allow to brown too much or to burn!
3).  Add tomato paste and fry in vegetables for about a minute.
4).  Add tripe and saute for about 5 minutes.
5).  Add paprika and marjoram and a little salt and pepper; salt is dependent upon saltiness of stock used.
6).  Add stock until ingredients are covered, but not swimming.
7).  Combine well, cover and allow to simmer for 1 1/4 hours.
8).  Remove cover and allow to simmer an additional 15 minutes.  If too dry, add a little more stock.
9).  Check for tenderness.  If not soft enough for you, cover and cook another 10 – 15 minutes.
10).  Adjust seasoning and enjoy!

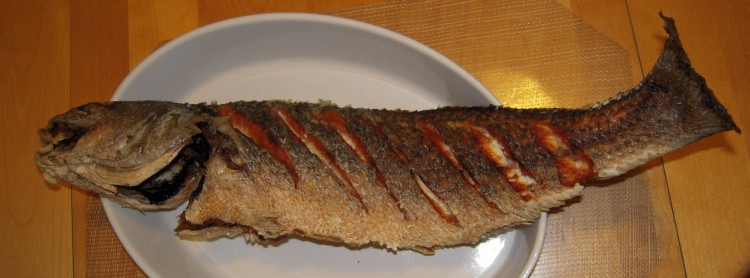
Crispy fried red drum

red drum 2010

Red drum, also known as redfish and spottail bass, was on sale at 99 Ranch Market in Richmond today, so I ordered one in the #6 style, which means cleaned and then fried crispy.  They do all of that extra stuff for free at 99 Ranch, which is helpful.  You can eat your fish as-is when you get home, or cut it into steaks for recipes that require frying before braising.

I usually peruse all the fish and then buy what’s on sale or looks interesting.  Today, at $2.99 a pound, the red drum seemed like the way to go.  They all had clear eyes and smelled good.

These bottom feeders were overfished during the 70’s and 80’s, the latter period no doubt the result of Paul Prudhomme’s blackened redfish, which was all the rage for a few years.  Found mainly off the coast in the Atlantic and Gulf of Mexico – which explains their popularity down South – they’re mild and flaky if caught small (under 15 pounds).

Apparently they can live to 60 years and reach 90 pounds.

Fried chicken livers – too good to believe

Fried chicken livers

Fried chicken livers

I bought some chicken livers to make chopped liver for my husband – which I do annually, but I thought I’d switch it up and make some fried chicken livers instead.  I had them at a soul food place awhile back, and they were so good I found myself fantasizing about them off and on.

This is one of the easiest things to make.  The only way you can screw them up is by overcooking, so don’t do that.

Fried Chicken Livers
     Serves several people as a snack

1 pound chicken livers, trimmed of connective tissue
1 cup milk
1 cup flour
1 tablespoon salt
Enough Canola oil to deep-fry in whatever heavy and deep pan you are using
Freshly ground pepper

1).  Place milk and trimmed livers in bowl and refrigerate for an hour or two and then allow to sit on counter for 30 minutes before frying.
2).  Start heating your oil.
3).  Whisk together flour and salt in a mixing bowl.
4).  Remove livers from milk with your hands and add to flour/salt mixture and shake around until livers are coated.
5).  When oil is hot (350 deg. F. is good, or when some white bread sizzles), shake excess flour off livers and add to hot oil carefully; do not crowd pan.
6).  Move livers around a bit so they don’t stick together.
7).  Fry until golden brown – should not take more than a couple minutes.
8).  Remove to paper towels to drain excess oil.
9).  Add a couple quick grinds of fresh pepper and enjoy while hot