Category Archives: Recipes

Roasted Peppers for Summer!

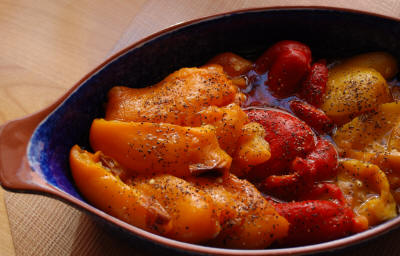
Tricolor roated peppers in blue dish with olive oil

Hurray for June!  It’s now bell pepper season in Cali, and I can turn out roasted peppers to my heart’s content!

Roasted peppers are delicious and cut a lovely appearance.  If you stick to a recipe that’s basic, leftovers are versatile.

There are a couple of ways to go here, depending upon how much time you have and what you want to do with them.

First, red and orange bell peppers are generally sweeter than the yellow, but it’s nice to have that extra color on the plate.  You’re free to include regular old green ones, but these have bitter notes, so I leave them off.

Try to get peppers that have been allowed to ripen on the plant, because they’ll be sweeter – more caramelization in the roasting process, you see.  This is why it’s great to buy at stellar produce shops like Berkeley Bowl and Monterey Market.  If you ask them this kind of thing, they’ll know.

Roasted Tri-color Peppers with Olive Oil and Black Pepper

2 red, 2 yellow and 2 orange organic bell peppers, washed and dried well
Olive oil
Sea salt and black pepper in grinders
Optional:  Shaved or grated Parmesano Reggiano

1).  Jack up your oven to 425 F. – convection, if you have it.
2).  Place peppers on a sheet pan and slide into oven.
3).  Using long tongs, turn them over now and again (like every few minutes) so they darken and cook evenly.
4).  When they are nice and brown/black — and they don’t need to be a solid brown/black, rather they should have lots of spots that are evenly distributed — take them out with tongs ASAP and pop into a couple of large Ziploc bags and seal them.  You are harnessing moist heat here to cause the skins to pull away from the flesh.  Put the bags in bowls in case the heat causes them to break, which happens, so that you catch the natural juices.  You’ll need the juices later.
5).  After about an hour, take out the peppers, one by one, and slip the skins (which should be loose) off.  Pull the stems off and gently tear the pepper to open it and push out the seeds with your fingers.  Don’t rinse them, rather use your fingers to get all the “bad” things off.
6).  Cut or tear them into large strips and arrange on a plate.
7).  Pour the pepper juices over the top.*
8).  Crank a little sea salt and coarse black pepper over peppers.
9).  Finish with a drizzle of excellent olive oil and some Parmesano Reggiano, if you like, but they are delectable without it.

*If you prefer, you can make a vinaigrette out of the pepper juices, olive oil and a little lemon juice, and top peppers with this

Leftovers (without the parmesan) can be served on a sandwich, like my famous egg, roasted red pepper, roasted potato and turkey breast on toasted whole grain bread.   You can also use them as a base for a pureed hot or cold soup, and in a ground walnut and red pepper spread, called muhammara.  Another fun thing to make with them is a terrine, layering the colors.  There are endless uses, and they will be about a million times better than what you get in a jar or can.

Roasted red pepper, egg, cheese, turkey, potato on whole wheat

If you have no time on your hands, you can make a simple roasted pepper.  Just wash, dry, seed, and cut up.  Arrange on a sheet pan and rub with a little olive oil to coat.  Add a dash of salt to the mix if you like, and roast at 400 F. until they get a bit singed.  Take them out and transfer to a serving dish.
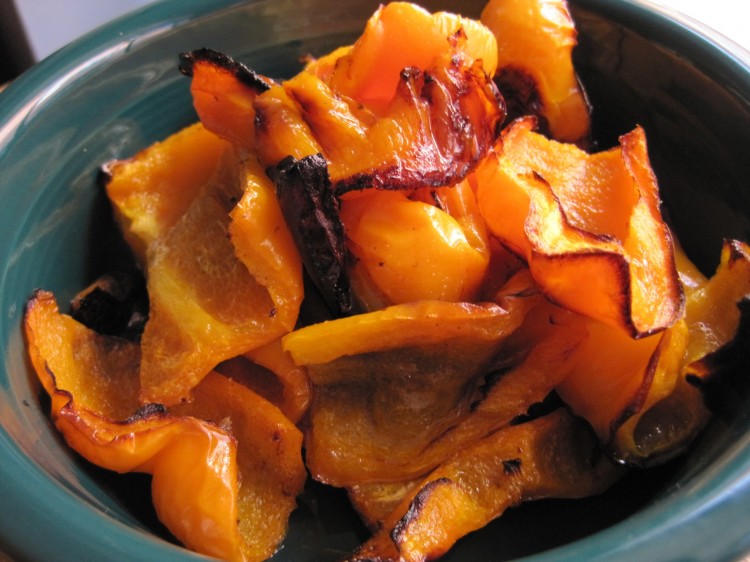
roasted yellow peppers in a green bowl

This version is tasty, but they still have their skins, so you’ll have to take that into consideration.

Savory Oatmeal for Dinner!

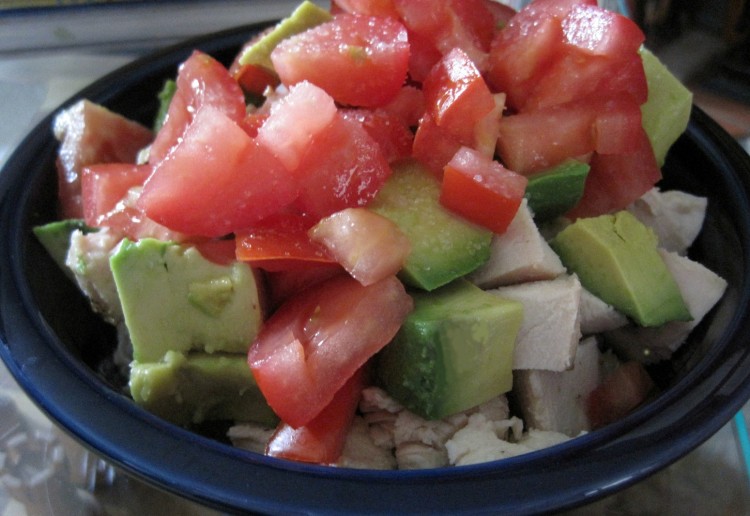
Does this look like a bowl of oatmeal? Well, it is!

Does this look like a bowl of oatmeal? Well, it is!

When I first came out with my savory oatmeal recipes, friends thought I was crazy.  Yeah – crazy like a fox.

The only reason people look at you like you have 35 heads when you serve oatmeal with ham and cheese is because it’s customary in the US to have it for breakfast – and to have it sweet.  Well, I don’t like it sweet.  And I don’t like it much plain.  Enter my plan to treat it like any other grain – which it is.

The one problem, if you can call it that, is the mushy texture.  No getting around that, but you can minimize it by using slow-cooking oats, and employing other ingredients that add some contrast.

The two recipes I came up with may be modified to your liking (and I encourage that!), but the oatmeal served with assorted toppings is best cooked only with chicken stock, and the version that includes cheese needs some milk and butter.  Makes sense, since the latter should turn out creamy.  You can use water in place of stock, of course, but it’ll be less savory.  Use a good, organic, low-salt stock if you don’t make your own.  A cheap, salty stock will taste terrible in this dish, so just…don’t.

Avocados are looking beautiful now at Berkeley Bowl, Whole Foods, Monterey Market and Raley’s, and I’ve even been able to get some decent tomatoes, so it’s a good time to try this frugal, healthy dish.  Just make sure to use high-quality, ripe fruit.  Don’t forget that avocados and tomatoes are both fruit!  Organic is best, if you can swing it.

I’ll give you the ham and cheese recipe, too, which you should try one rainy day.  It looks like you won’t have to wait until next winter for that, given the weather here in the Bay Area!

Don’t be put off.  My family loves this stuff.  My Mother-in-Law won’t eat it any other way, in fact.  You have to at least try it.

Oatmeal with Avocado, Tomato and Sea Salt
  
Serves at least 6 as a full meal

4 cups thick-cut oatmeal (not instant – the slowest cooking kind you can get)
2 quarts organic, low-salt, chicken stock
Pinch of salt
2 large, ripe, Hass avocados, cubed
2 large, ripe, good tomatoes, cubed
1/2 tsp. black pepper
Coarse sea salt

1)  Add oatmeal, pinch of salt, pepper and chicken stock to heavy guage dutch oven or similar vessel and stir to combine
2)  Bring to boil and then reduce to a simmer
3)  Cover and cook to desired consistency, stirring often, especially when the mass starts to thicken (I cook for 20 minutes when using the really thick oats)
4)  Spoon into deep serving bowls
5)  Top with avocado, tomato and a couple cranks of sea salt

Note that I sometimes add cubed, leftover chicken breast before the avo and tomato, as in the photo, but this is optional.

Ham & Cheese Oatmeal
   Serves at least 6

4 cups thick-cut oatmeal (not instant – the slowest cooking kind you can get)
1 quart organic, low-salt, chicken stock
2 cups milk
2 cups water
2 cups finely cubed cooked ham
3 tablespoons butter
1/2 tsp. white pepper
1 1/2 – 2 cups aged (or extra sharp, at least) white Cheddar cheese in small cubes.  Use good, natural cheese!

1)  Add oatmeal and all liquids to heavy guage dutch oven or similar vessel and stir to combine
2)  Bring to boil and then reduce to a simmer
3)  Cover and cook to desired consistency, stirring often, especially when the mass starts to thicken (I cook for 20 minutes when using the really thick oats)
4)  Stir in pepper, butter and ham and allow to cook for another 30 seconds
5)  Remove from heat and stir in cheese, but do not mix it in too much because you want to wind up with pockets of melted cheese
6)  Cover and allow to sit for a couple of minutes
7)  Serve in deep bowls under a couple of over-easy eggs, if you want to be fancy about it

Warm Roasted Brussels Sprouts Salad

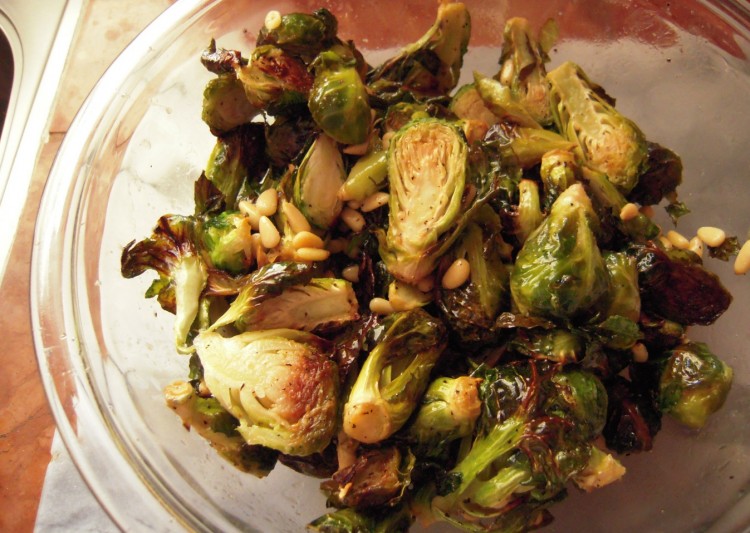
warm brussels sproats salad with pine nuts and nut oil

I love a warm salad during summer.  It can sit out on the counter while your meat or tofu grills and be the better for it.

I make these salads a little luxurious, too, by breaking out my pricey specialty oils, like walnut and hazelnut.  Sticking to fresh produce and a simple preparation allows the flavor of the oil to shine.

One salad I’ve honed combines Brussels sprouts, pine nuts and a vinaigrette made with orange juice, hazelnut oil and a little onion powder.  Onion powder is one of those oddball things that adds complexity and prevents blandness, especially with concoctions containing citrus juice.  Don’t substitute raw onions -they won’t work the same way.

Now, not everyone likes Brussels sprouts, so feel free to substitute green beans.  If you like these cabbage creatures, however, you’ll love the way this salad provides a little sweetness and nuttiness to balance their strength and bitter notes.

I generally make this when Berkeley Bowl and Monterey Market have beautiful, fresh Brussels sprouts with tight heads.  The fewer stray leaves you have for this recipe the better, but nothing’s a show-stopper.

Roasted Brussels Sprouts Salad
Serves 6

2 pounds Brussels sprouts
Scant 1/4 cup canola oil
Sea salt
3 tablespoons pine nuts

For vinaigrette:
2 or 3 tablespoons roasted hazelnut or walnut oil*
1/4 cup fresh orange juice (from sweet oranges – not too tart)
1 teaspoon white vinegar
1/2 teaspoon onion powder
1/4 teaspoon ground white pepper

1).  Whisk together ingredients for vinaigrette and set aside.  Don’t worry about the lack of salt.
2).  Toast pine nuts quickly in a saute pan.  Keep them moving over a medium-low flame.  You know how to do this.  Move to a small bowl and set aside.
3).  After you clean and trim sprouts, steam them for a minute or two, depending upon size, and then plunge into cold water to stop the cooking process.  Dry thoroughly (this is important!) and cut in half, lengthwise.  You can roast them without par-cooking; try it both ways and see what you like best.
4).  Toss sprouts with canola oil and a generous number of cranks of sea salt on a sheet pan.  When coated, arrange them cut side down.
5).  Roast at 400 F. until you get some browning action on the cut side, but you don’t want them to overcook.  Sometimes this takes 10 minutes, sometimes 20, like if I’m working with Rambo-sized vegetables.  Once they are just tender, remove them to a nice, large bowl regardless of how they look.
6).  Pour vinaigrette over Brussels sprouts and toss to coat.
7).  Taste and adjust seasonings.
8).  Allow to sit on counter for a good 45 minutes, tossing every now and then.
9).  Top with pine nuts right before you serve.

*This can be expensive, like $15-for-a-small-bottle expensive.  Sometimes the people from La Tourangelle are at Costco selling an assortment pack of three 8.5 ounce bottles of oil, usually hazelnut, almond and walnut, for $20.  This is a steal.  Keep it in the fridge – this is a must!

Fried Sweet Plantains

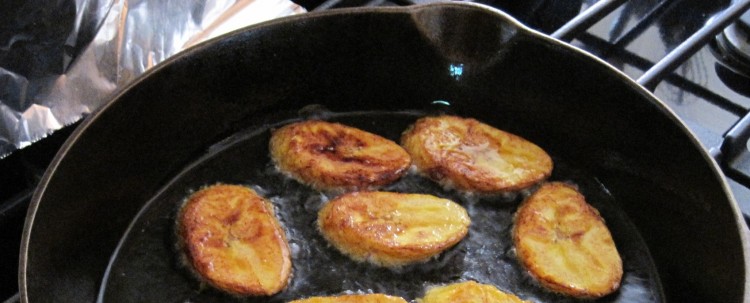
fried plantains 5-10

reviewed Yardie Jerk in Oakland for GraceAnn Walden’s Yummy Report recently, which has me on a fried sweet plantain kick.

Sweet, soft and sticky fried sweet plantains taste almost like a dessert, and go very well with spicy grilled chicken or fish.  They’re good with pretty much anything or with nothing, when you get right down to it.

Plantains, or cooking bananas, are a staple in tropical countries and served multiple ways – kind of like how we use potatoes.  I love them – especially fried.  My Puerto Rican friends in New York used to make tostones for me when I was a kid.  Tostones are twice-fried plantain slices made from green (not ripe or minimally ripe) fruit.  The level of sweetness is dependent upon ripeness.

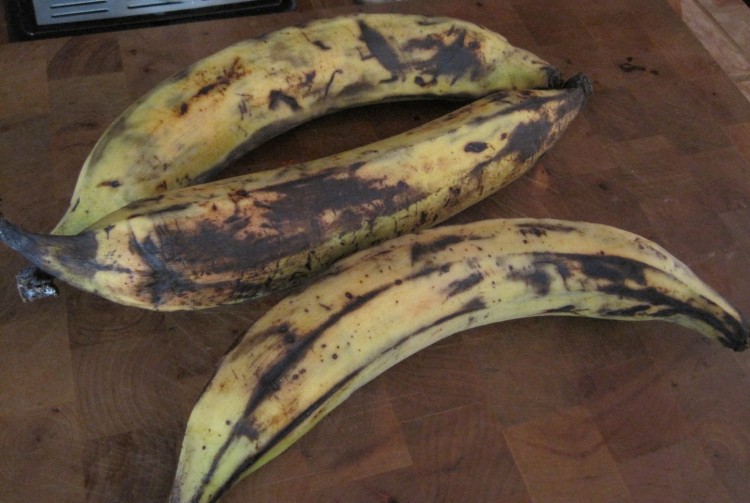
plantains 5-10

The plantains in the photo are getting nice and ripe, and, if fried slowly in oil that’s not too hot, will get you an exterior with a little texture, as in the photo at the top of this post.  Overripe fruit will turn out very soft and sticky, as in the photo of Yardie Jerk’s version, below.

Fried plantains from Yardie Jerk in Oakland, CA

Remember to fry slowly so the sugar caramelizes and you don’t wind up with something like chips, though they’re good, too.  It takes a little practice to deal with the oil.  If it’s way too low, though, you’ll wind up with greasy plantains, and you don’t want that.

Use a cast iron frying pan, if you have one.  The one in the photo at the top is an Erie skillet that’s over 100 years old.  Nothing, but nothing, sticks to that baby.  I like that people were frying things in there before my Grandparents were born, and here I am, with my plantains, in 2010.

Fried Sweet Plantains
   Makes a large plate

3 plantains, very, very ripe (they will have quite a bit of black)
1/2 cup olive or canola oil (you may need more, but this is a good start in a 9 or 10 inch skillet)
Sea or Kosher salt, for finishing, if desired

1).  Wash and dry plantains.
2).  Cut off ends and make a slit through the skin along the entire length, but try not to cut into the flesh.
3).  Roll skin off plantains.
4).  Slice (at a 45 degree angle) into approx. 1/2 inch lengths.
5).  Heat oil in your heavy skillet, but don’t get it too hot.  Test with one slice of plantain.  You want a little bubbling action but not a real sizzle.
6).  Add plantains to pan, but don’t overcrowd.
7).  Fry on one side until you have the color you are looking for, then turn over with tongs.  With overripe fruit you can get a nice, dark color.
8).  When done remove to paper towels and sprinkle a little salt on them, if you want.
9).  Fry remaining slices in batches in similar manner.

Greek-style Chicken Halves

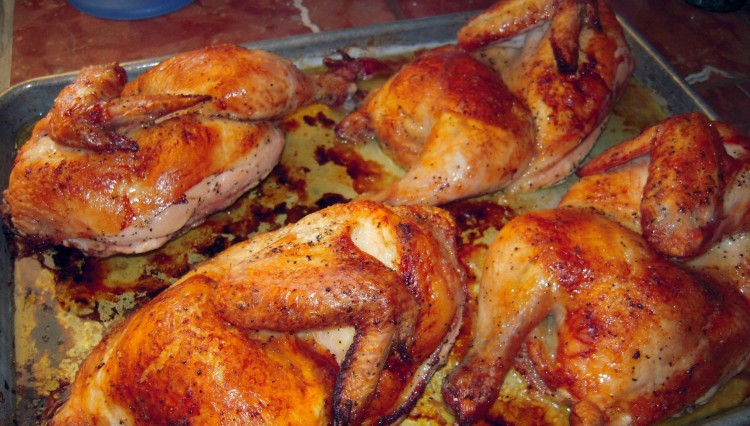
greek roast chicken 2010

Since we’re heading into grilling season big-time, I thought I’d share one of my go-to recipes for moist, golden, flavorful chicken.

The original recipe came from a friend who is of Greek extraction and whom I knew during my many years as a resident of Astoria, Queens, in New York City.

Astoria was and is a great place to eat.

Though the ethnic make-up of Astoria has been changing over the years,* there is still a large Greek community, whose roots go back to the 1960’s.  There’s a European feel to this part of Queens, which lies right across the East River from Manhattan.  In the early 1980’s, when I was young and single, I used to take the subway from Midtown Manhattan the few stops home and then pop into a cafe on 30th Avenue for a snack and an iced coffee to people-watch.  Getting off the train in Astoria was like entering a little oasis.

While the neighborhood has grown, it still feels like a distinct community, and there are wonderful Greek restaurants and stores.  I really miss being able to buy 10 kinds of feta and 30 kinds of olives at Titan, a large Greek market, whose prices now seem mind-boggling considering how much these things cost in the San Francisco Bay Area!

And the pastry shops!  In Astoria you can go have Greek pastry, or even tartufo, an Italian ice cream ball stuffed with fruit and covered with chocolate, in the middle of the night.  Given the heat during Summer, and the state of the wiring in our apartment building that would not support AC, this was a good way for us to cool off.

My son was 8 when we moved to California, so, at 23, he is a more a Californian than anything else, though he likes to go down memory lane via his taste buds.

This chicken recipe is something that really reminds us of warm nights spent in outdoor restaurants eating pita bread with dips and lemony chicken that came to us right off the grill or spit.

I’ve since adapted my friend’s recipe, but it remains true to its heritage, with bright, straight-forward flavors.

I’ve made this with my Weber charcoal grill and in the oven.  If you grill outdoors and can use the indirect method with charcoal, it works very well,  The wind patterns in my current yard don’t allow me to crank up the heat sufficiently, so I use the direct method with some heavy-duty foil.  I do not yet have a gas grill, so I can’t give you any tips for that.

I use a sheet pan with a flat rack for this if I’m using my oven.  The rack is more or less like a cooling rack.

This is great served with pita wedges and a Greek salad.

*There is now a large Arab community in Astoria/Long Island City, which gives you an even greater variety of food and drink options these days than when I lived there!

Greek-style Grilled or Roast Chicken Halves
   Makes 4 halves

2 nice young chickens, cut in half with poultry shears (use good chicken!)
2 or 3 fresh lemons, squeezed of their juice (no bottled lemon juice!)
1/4 cup Dijon mustard
1/3 cup olive oil
Kosher salt
Freshly ground pepper

1).  Rub lemon juice into chicken halves very well, getting into all the nooks and crannies.
2).  Salt and pepper the chicken halves very well.
3).  Whisk mustard and olive oil together.
4).  Brush mixture over entire surface of chicken, again being thorough.
5).  Place in fridge for a couple of hours.
6).  Roast in oven at fairly high heat (something on the order of 400 deg. F.), skin side up, on a rack, until internal temp reaches 165.  If you grill chicken outdoors, use your best method for browning the skin and keeping it intact.