Tag Archives: vegetables

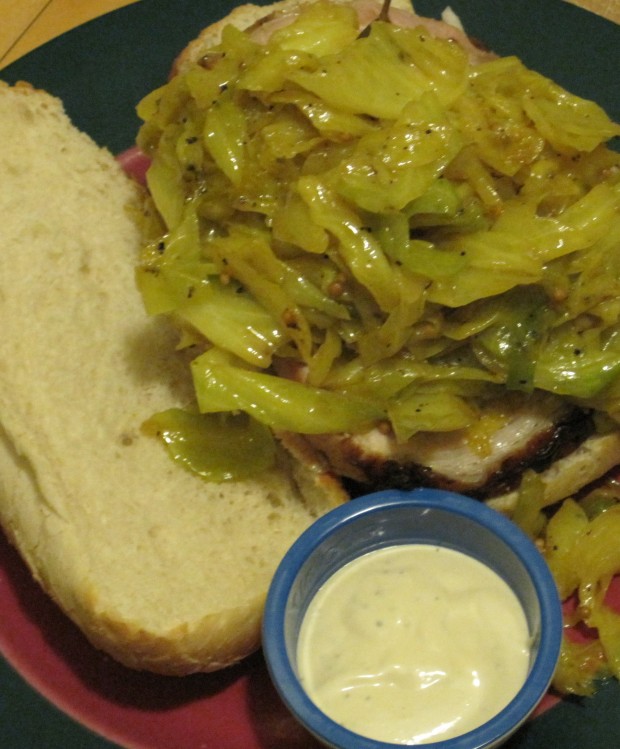
Pork loin & bacon fat-sauteed cabbage sammies

bacon slaw & pork sammie 1-24-10

Bacon Slaw and Pork Sammie

I have some leftover mustard-encrusted pork loin roast from the day before last, and I just saw 3/4 of a head 0f cabbage in my vegetable crisper, which makes me happy I saved the bacon fat from the BLTs we had a couple of weeks ago.  I know I have one bagel, one piece of naan and one sub roll, as well as fixings for mustard aioli – if I scrape out the large jar of Best Foods I bought for the holiday season, that is – so that, my friends, means there will be a dinner for three tonight, and I’ll let the boys fight over the bread and take the one that’s left.  Something tells me it’ll be the naan.

Cabbage Sauteed in Bacon Fat

1 Small head green cabbage
1/4 cup rendered bacon fat
1 tablespoon whole mustard seeds
2 bay leaves
1 teaspoon turmeric (optional)
Salt & pepper

1).  Cut cabbage in half and remove core by making v-cuts into each half as it sits cut side down on board
2).  Shred cabbage (medium to large shred)
3).  Wash and spin-dry shredded cabbage
4).  Add bacon fat to wok or other deep vessel on medium flame (I often use my trusty Wolfgang Puck electric wok for this)
5).  When oil melts, add mustard seeds
6).  When mustard seeds begin to pop, add cabbage, bay leaves, turmeric and a little salt & pepper (amount of salt depends upon salt content in bacon fat used)
7).  Turn flame to high and stir fry for a few moments
8).  Cover and cook, over medium flame, stirring now and then, until cabbage is at desired consistency.  About 7 minutes is usually good in terms of leaving a little texture intact

This is good served with a non-clashing pork roast, i.e., one that has been rubbed with a paste of Dijon mustard, ground thyme, a little oil and some salt and pepper.  If you serve it on a pork sandwich, make mustard aioli to serve on the side.

Mustard Aioli

1/4 cup of good mayonnaise, like Hellman’s/Best Foods
1 heaping tablespoon Dijon mustard
2 teaspoons fresh lemon juice
1/2 teaspoon black (or white) pepper
1/2 teaspoon salt

Whisk everything together, adding more salt and/or pepper, if you like, and allow to sit in fridge for a couple hours to meld.

Scallion guacamole

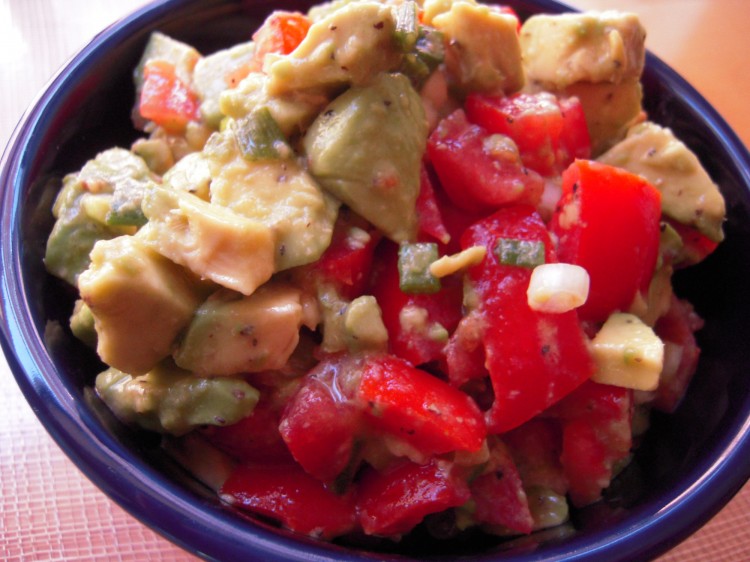
Scallion guacamole

Scallion Guacamole

The weather has been crappy so I want to serve something to brighten up the day around here.  Given that I have a number of ripe avocados on hand as well as many limes waiting to be picked, I thought guacamole would fit the bill.

I love any reasonable form of guacamole and often experiment with ingredients, particularly those that can stand in for the cilantro and chilies.  Today I don’t want much heat and would rather amp up the sour element, so I decided to go with scallions and extra lime juice.  Sometimes scallions are skinny and lifeless, but Berkeley Bowl had some great looking, large, crisp scallions the other day, so they will really work well here.  When using scallions, you can also nix the red onion.

One important note it that you should always use fresh lime juice in guacamole.  It makes a difference!

Scallion Guacamole

2 large (or 4 small) ripe Hass avocados (they are ripe when they have a little give when pressed – but not too much)
1 medium tomato (use a decent, ripe tomato!)
4 nice, leafy scallions (aka green onions)
3 tbsp.  fresh lime juice (at least)
3/4 tsp. coarse salt (Kosher is fine)
A few grinds of black pepper

1).  Remove the seeds and pulp from the tomato and give it a rough chop.
2).  Chop scallions into 1/4 inch rounds.
3).  Give your avocado flesh a rough chop. (for help in dealing with getting at the flesh, look here)
4).  Gently combine all ingredients in a non-reactive bowl.
5).  Adjust salt and lime juice to your liking.

Note:  If you are not going to serve right away, add the tomato at the last minute.

This one is especially good with grilled chicken or salmon.

Creamy butternut squash soup

Creamy squash soup ready to ladle out

Creamy squash soup ready to ladle out

When I was at Costco last week I noticed that they were hawking bags of cubed butternut squash ready to cook.  At $5.49 for 2.5 pounds, and my shortage of time this week, it was serendipity defined. 

I decided to make a killer squash soup for the fam, who declared it the best I ever made.  Here’s the recipe:

Creamy Butternut Squash Soup

2.5 lbs. cubed butternut squash (about 1″ cubes)
3 tbsp. canola oil
1 quart chicken stock
1/2 tsp. ground dried thyme
3 tbsp. unsalted butter
1/4 cup heavy cream
1/4 c. mild, creamy bleu cheese, in very small pieces, for garnish (you could even use a hybrid like Cambozola)
Kosher salt & white pepper

1).  Place the squash on a sheet pan and rub with the oil and some salt; spread out in single layer
2).  Roast at 400 deg F. until the edges start to get a bit brown – at convection, if you have it.  This should take no more than 30 mins.
3).  Removed the squash from the sheet pan and place in a dutch oven, being sure to get any stuck-on bits.
4).  Add the chicken stock and bring to a boil.
5).  Reduce to a simmer, cover, add the thyme, and allow to cook for about 25 mins.
6).  Add a little white pepper and then blend with an immersion/hand/stick blender (directly in the dutch oven) until very smooth.  Alternatively, blend in batches in a regular blender, but at your own risk! 
7).  Place pot with blended soup back over very low flame and add the butter, which should be stirred in until melted.
8).  Bring to just under a simmer and turn off heat.
9).  Stir in heavy cream and adjust seasoning.
10).  Ladle into bowls and garnish with bleu cheese

Squash soup being simmered

Squash soup being simmered

Warm potato salad

Here’s a recipe courtesy of Chef Erwin Pirolt, one of my cooking school instructors.  This is a close second to German potato salad, but has no bacon.  It has great flavor and I make it all the time, so trust me when I tell you you have to give it a try.  Be sure to get some high-quality beef base for this – not the cheap stuff that’s all MSG.  If you have rich beef stock, this would be a good time to dip into your supply.
 
Warm Potato Salad (variation of German recipe)
5 lbs new potatoes (do not use floury potatoes!)
2 onions, finely chopped
4 or 5 T Dijon mustard
2 or 3 T Worcestershire sauce
1 1/2 c salad oil
1/2 c cider vinegar diluted in 1/2 c water
1/2 beef bouillon cube diluted in 1 c water
4 to 5 cloves garlic, finely chopped
Fresh chives, finely chopped
Salt, to taste
Pepper, to taste

1) Boil potatoes in their jackets, peel and slice while piping hot 
2) Add onion, mustard, Worcestershire sauce, salt & pepper (do not toss until indicated)
3) Pour oil over top
4) Pour diluted vinegar over top
5) Pour bouillon over top (do not use all if it would make salad too watery; use more if too dry – use own judgement here)
6) Add garlic and gently toss
7) Top with plenty of chopped chives

NOTES: Salad is especially good when it sits awhile

Easy green bean salad

Green bean salad

When you want to serve a large family or don’t mind leftovers and are in a pinch, this is what you want.  Easy and tastes good.  If you get all postal with me about the canned beans, feel free to use fresh – I won’t stop you.  This is where that $2.50 #10 can of Blue Lake green beans from Costco comes in.

Easy Green Bean Salad

1 #10 can (big, big can) of green beans (not French cut, please)
1/2 red onion, large, finely chopped
1 cup white vinegar
1/2 cup canola oil
About 3 T sugar

S&P

Intersperse the drained beans and chopped onion in a large, shallow bowl.  Set aside.  In a small bowl, whisk the vinegar and sugar, ensuring that all the sugar dissolves — you might have to leave it and come back to it a couple times.  Taste it.  You want the sugar to significantly cut the acidity of the vinegar so that it is sweet-sour.  Adjust as needed.  Whisk in a large pinch of salt and a couple big dashes of pepper.  Whisk in the oil.  You are making, basically, a watery vinaigrette.  Use more or less of each, as you like, but don’t make a traditional vinaigrette for this dish.  Adjust S&P.  Pour over the green beans and leave out for an hour.  Every 15 mins or so bring the beans from the bottom of the bowl to the top so they are all equally marinated.  If you use a large, stainless steel bowl, this will work well since you can take a large spoon and run it down the side to pull beans up from the bottom.  What you don’t want to do it create a mush, so be gentle.  If you are serving the next day just cover and pop in fridge.  Take out a good hour before you serve so it is not ice cold.

Notes:  Better the next day and good with tuna sandwiches.