
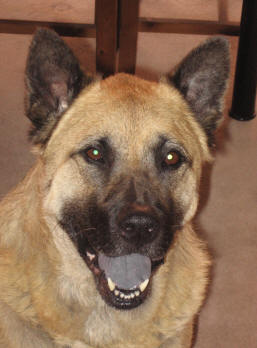
 This is the real Akitachow, Berry, who was adopted from the Berkeley Animal Shelter in 2001.
What we have here is an untrifling and more or less unfriendly individual. His given nickname, non barkus mentis, sounds funny but isn’t correct. Non latratus canis might be correct but isn’t funny. It means he doesn’t bark — much, anyway. He basically hangs out at home in his futon chair or in the office on his half of a queen-size futon. His night bed is next to ours and he spends time there when we all go to bed but tends to wander around like a security guard at regular intervals. He prefers to be close at hand when we’re home, but you can’t pester or hang all over him since he hates that. A little affection goes a long way with an Akita — in both directions — so this is not a dog for people who need to fawn or be fawned over.
Berry doesn’t like it when strangers come over, and it takes a long time for him to warm up to others, though there are a couple of people he took to right away, like my friend Paul. Anyone who has a dog knows dogs have great built-in character meters. If someone comes over and your dog really despises them, beware! You’ll be able to detect this even with an Akita, who, out of instinct, will not want anyone else around — even if he has nothing specific against them. When an Akita truly doesn’t trust someone he’ll give a look that will freeze the blood in their veins. In my experience, this happens most with a person who comes across as having something to hide. In that case Berry won’t let him or her out of his sight, as opposed to how he treats other guests — simply ignoring them and being casually rude in an attempt to get them to leave as soon as possible. Then you have the poor soul who is afraid of dogs. Berry, like most canines, is able to smell this a mile away and, out of suspicion, will stick like flypaper to that person.
How did we come to bring him home? In June of 2001 Berry was abandoned and then lived at the animal shelter in Berkeley for over three months. Matthew, my son, was working there at the time and had his eye on him. We all agreed to take this 105 pound two-year-old when it was clear he would never be adopted. Akitas are not great adoption risks as they have long memories and are powerful and dominant. This character also appeared to have a bit of Chow in him, what with that purple tongue, and Chows are also a challenging breed. This type of dog is not very good at “playing the game” when potential adopters come to call. Unfortunately, many people won’t select a dog who doesn’t jump up and wag his tail — which many shelter dogs do, despite their individual histories. Akitas living in the lap of luxury won’t do this, let alone those at an animal shelter, since they consider any form of obsequious behavior beneath them. They’ll never fetch, that’s for sure. Playing fetch with an Akita means that you wind up running to get the stick after they watch you throw it and then sit down, looking the other way.
I love big dogs and don’t require that they have no spirit, so I wanted to take him home as soon as possible. Once Steven, my husband, who was at that time mainly a “cat person,” saw Berry, who was quietly resting and almost bored by the eighty other dogs at the animal shelter going absolutely insane, that was it. He immediately recognized Berry as a fellow introvert and they quickly bonded. Berry considers Steven the pack leader and generally respects his authority and listens to him most of the time. Matthew, however, still finds himself (in 2012) at the bottom of the pack because he allows Berry to push him around a little, for example yielding his space when they are both trying to get through a narrow hallway. Behaviors aside, I think Berry will always see Matthew as the 14-year-old kid he was when we adopted him — no matter how much Matt asserts himself. My own childhood dog, Freddie, a husky-malamute mix, never took me seriously — even when I became an adult — so I’m familiar with this phenomenon, although Freddie never gave me that “look of death” Berry gives Matthew.
While things have been great, there is the occasional dramatic moment. In 2005 another dog attacked him. Go figure. Why would a smallish dog attack an Akita? That crazy dog jumped out of a car while the human was unpacking it and not paying attention. The two dogs were attached jaws to throat going round and round while growling to beat the band. The human, a small woman, grabbed the leash her dog was attached to and pulled for all she was worth, but was not strong enough to control her dog. When Steven pulled he wound up dragging the circle of snarling dogs with him. Berry is a cool customer, but he does not attack other dogs. He has no problem, however, defending his honor and promptly engaged teeth when called to the task. Eventually Steve was able to wrestle Berry away from the scene. Apparently the fight had not ended on exactly the right note for Berry, who arrived at home looking sheepish and dejected. While looking him over and reassuring him that, of course, he had won the fight, there was no question, we saw puncture wounds on his neck under that double coat. Matthew, Steven and I loaded him into the car and drove over to the animal emergency hospital in Berkeley.
Anyone who has been to an all-night animal emergency room knows they contain the same kind of drama as any other ER. There were dogs who got into glass in one form or another, had allergies, were given emergency cesarean sections. There were fights in the waiting room — and not just by the dogs and cats — and a host of half-dead looking people sitting in Naugahyde chairs being lulled by an instrumental version of “You Light up my Life.” Finally, after waiting three hours, we were called in. Berry was examined, neck hair shaved, topical ointment applied, and sent home with antibiotics. I still have fantasies about kicking that woman’s a– for not having her dog under control — and for owning a dog she can’t handle in the first place.
Under the adage “no good deed goes unpunished,” Berry’s allergies have cost us a fortune. Itching, chewing, hot spots, infections. Then, in 2005, he was diagnosed with the autoimmune disease sebaceous adenitis, which has us schlepping miles and miles to a veterinary dermatologist at regular intervals. In a nutshell, his own system is destroying his sebaceous glands and he is losing his coat, little by little, as his skin turns into scaly patches. While it’s difficult to manage and he’s looking pretty mangy, the main medical concern is secondary infection. The only drug that does some good makes him sick, so we’d rather have him looking a little sparse than feeling bad all the time. The ‘natural’ solution involves oil baths. Enough said.
We bought him some sweaters since he now has almost no undercoat, but he refuses to wear them. My friends tell me, “Just leave them on — he’ll break down eventually and wear them!” No he won’t. Akitas are the most stubborn dogs on the face of the earth. They would rather die of sleep deprivation than comply with an e-collar or a Halloween costume or sweater. I feel bad for him because he had such a beautiful, lush double coat, but he continues to walk around like he owns the place, so I suppose he’s OK with it.
At this point I’m calling him “old school,” since he’ll be 13 in June, but he’s still a force to be reckoned with!
Update: Our beautiful Berry passed away in June of 2013, at age 14, but will live forever in our hearts and my website. We now have two cats, Puffy and Cleopatra, who showed up in my yard, homeless, less than a month after Berry passed away. I think Berry sent them.
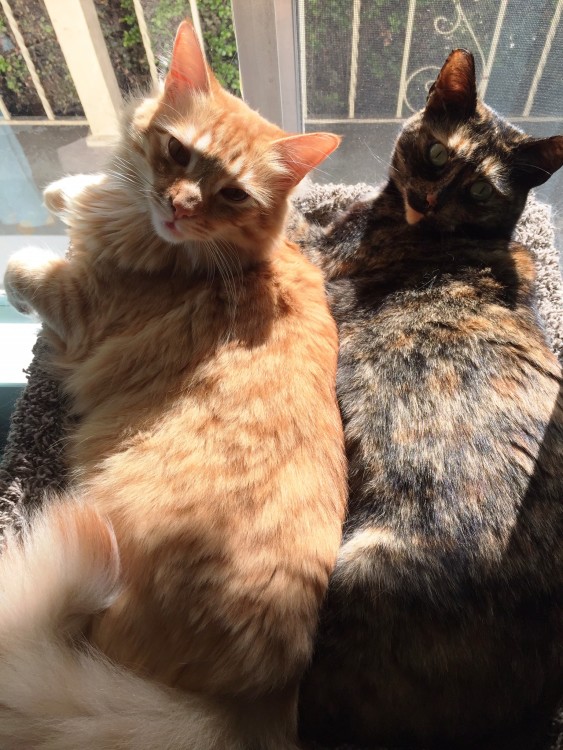
Puff, the orange Maine Coon mix, and his Tortie Mom, Cleopatra. They claim a dog did not send them.
I had a white akita chow. I lost her April 6, 2014. She was a month shy of 14 years old. She was the best dog ever. She was very protective of our family, but she shyed away from unfamiliar men. She had been abused shortly before I rescued her. She had 6 puppies in my yard. I found homes for all her puppies. I loved her for the rest of her life. If I have an opportunity to have another Akita Chow, I would not hesitate at all.
Thanks for your comment, Cheryl.
Sorry, I have been away from this blog due to illness, so I did not see your comment until now. Yes, akita-chow mixes are the best! I am so sorry you lost her, but 14 is a nice ripe old age for such a big girl. I send my best wishes.
-Renate